By far the best Atari Jaguar emulator for Windows and Linux PC is Phoenix Project. Phoenix Project has had an active development cycle since 2006. Created by an all Russian team, the emulator is also in the Russian language. However a 3rd party developer has created an English translation patch for it. Phoenix Project emulates the following video game consoles, 3DO, ColecoVision, Sega Master System and Atari Jaguar. It emulates 95% of Atari Jaguar’s video game library at full speed. Every single rom I have thrown at it, plays at least decently well. I can confirm it’s better than any other Jaguar emulator currently available. The Majority of Jaguar emulation seekers/players only know about older more popular emulators such as Project Tempest and Virtual Jaguar. Phoenix Project is really the only playable option. In this article I am going to show you how to set up Phoenix Project, step by step. I tried to make this tutorial as simple as I could. Sooner or later I will create a Youtube tutorial video. Don’t hesitate to comment below if you need help or have a question.
How To Set Up Phoenix Project Jaguar Emulator on Windows Or Linux PC?
Important. Before we start please make sure you have Winrar or RAR installed for the operating system you are using. So you can extract .zip and .rar files needed for Phoenix Project emulator. If you are unfamiliar with Winrar, watch this video.
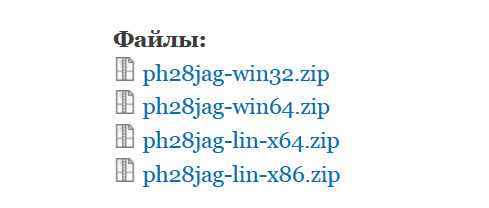
1. Go to the Phoenix Project Website. Scroll down near the bottom of the webpage, where it says Файлы: and download the Phoenix Project emulator .zip file that matches your operating system Windows 32, Windows 64, Linux 64 or Linux x86 . (Your options are: ph28jag-win32.zip, ph28jag-win64.zip, ph28jag-lin-x64.zip, ph28jag-lin-x86.zip)
2. Find the location where you downloaded Phoenix Project emulator .zip file and extract it to any directory you wish, just remember where it has been extracted to.
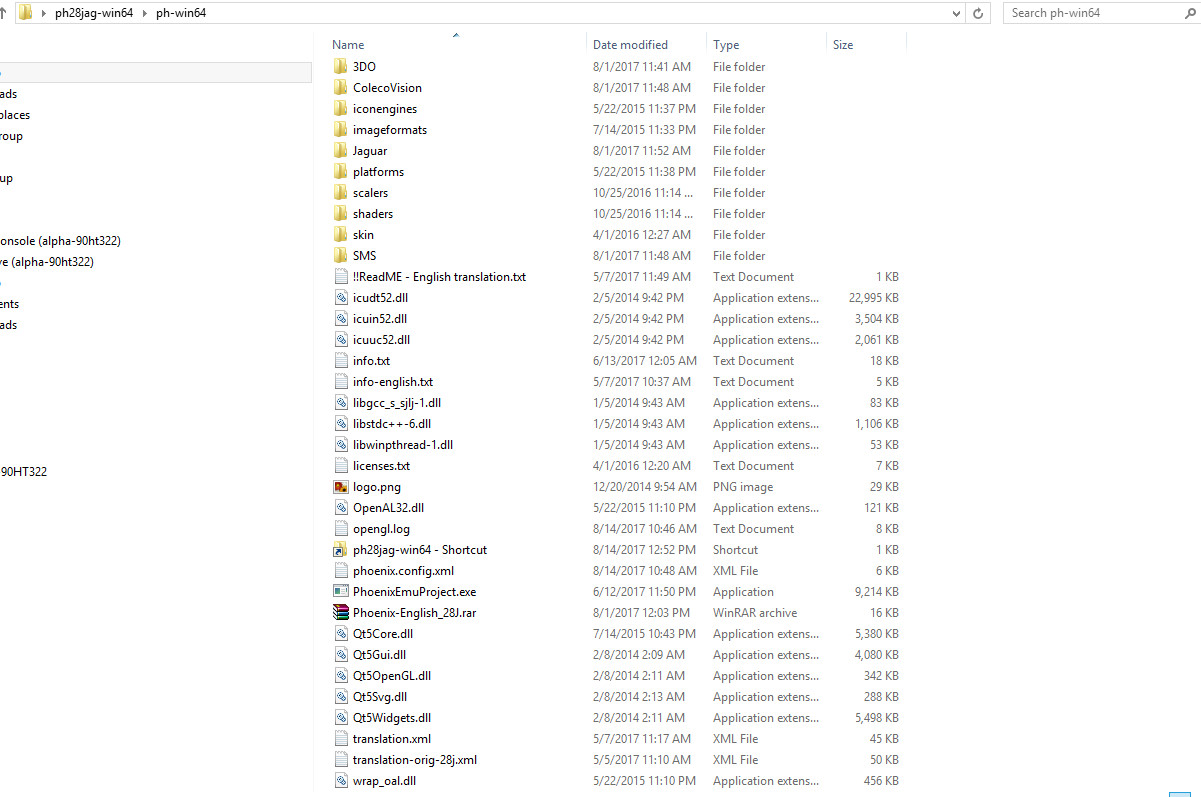
3. Open your extracted PH28jag folder, You should have a file directory that looks similar to this inside. (NOTE: This is the Main file directory, it might look a little different, depending on which operating system you are using.
4. If you don’t know the Russian language, you will need to download the English translation Patch .rar file created by Zandig Slaytanic of ngemu.com. Download and follow number 2 of his directions here. Skip number 1 of his directions, we already did that. (EXTRA HELP: You will have to extract the English translation .rar file into the main Pheonix Project Emulator directory (See Image above). Overwrite all old files with new English patched files).
5. Now you will need the Atari Jaguar Bios File (System Bios) You can download it here at Emulator.games. After the bios file is downloaded, Extract the file [BIOS] Atari Jaguar (World).j64 to the Jaguar/ “Bios Folder” inside the main PH28jag folder directory. The directory and file should look something like the images below.
Image of the main Atari Jaguar Directory inside Ph28jag directory.

This image shows inside the bios folder where you need to place [BIOS] Atari Jaguar (World).j64 file

6. Download roms (Games) to use for Project Phoenix. Just search Google for “Atari Jaguar Roms”. After you have a rom downloaded, extract it to the Atari Jaguar “CARTRIDGE Folder”. Directory and file should look something like the image below. NOTE: Download and extract as many roms as you like, to this folder.

.7 Now go back to the main directory ph28jag and double click on PhoenixEmuProject.exe (This is the main emulator file). Boot up the emulator. Select the “Red Jaguar Paw” to the left. should look like the image below.

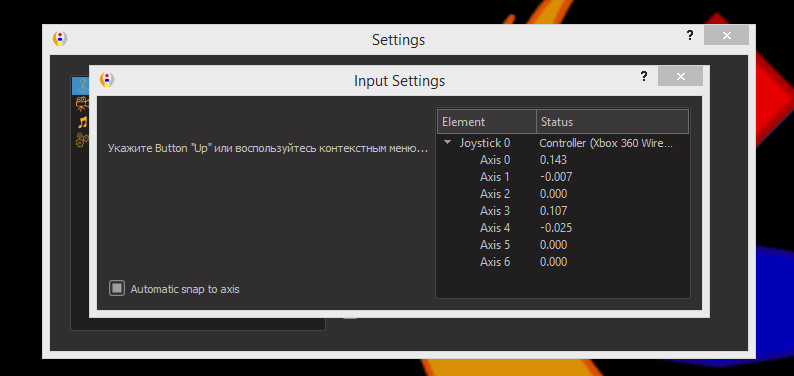
8. Lets Setup Controls before we mount the bios and load up a rom. To Set up controls is easy, go to “Tools” tab at the top left, Then go to “Settings”, Then to “Controls”. Click “Create”, now with your Keyboard or gamepad select what control inputs you want for each button. NOTE: for game pads after I set up directional and A, B, C, Start and Select buttons, I set up keyboard buttons for Atari Jaguars number pad, because obviously most game pads don’t have enough buttons to hold all of the number pad buttons. When done the emulator will automatically save your control setup. See Image Below.
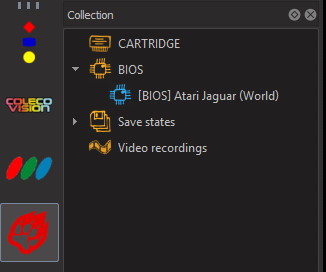
9. Make sure the “Red Jaguar Paw” is selected. Now load up the bios file by going to “File” at the top left. Then select “Add Bios Dump In The Collection”. Now go to the Jaguar/Bios Folder and select the [BIOS] Atari Jaguar (World).j64 Bios File. If Bios was mounted correctly, it should look like the image below in the Bios area.
10. Make sure the “Red Jaguar Paw” is selected. Now Load up a rom (game) file by going to “File” at the top left. Then Select “Add CARTIDGE dump in the collection” Now go to the Jaguar/Cartridge folder and select one of the game roms you have downloaded. If the rom was mounted correctly, it should look something like the image below in the cartridge area.
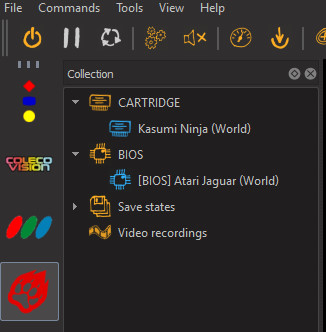
11. To load your game. Double Click on the game title (In my case it’s Kasumi Ninja) and then hit the power button to start the game. See Image below.

12. To toggle “full screen” press F11 Key.
13. Click the power off button and load another CARTRIDGE to play a different game.
14. Start loading all kinds of games from the classic Atari Jaguar. If you have any issues let me know down in the comments below. NOTE: Some roms have a few issues. Menu Glitches, Lagging, and sound problems. In-game Phoenix Project emulator runs most games flawlessly at full speed. Images below showcase games running on Phoenix Project emulator.


* Bonus* What’s the best Atari Jaguar Emulator For Android Phones Or Tablets?
Phoenix Project subversion known as IrataJaguar is available at the Google play store for $5. I have not used it yet. Judging from the comments, it’s currently the best Atari Jaguar emulator for Android Devices. You will need a very fast phone or tablet to run it though.
NOTE: Please be sure check out my article featuring the best Atari Jaguar Games, Including CD games also.